Subscriber Exclusive
Knitting Saddle Shoulders: 7 Things You’ll Wish You Knew First
Saddle shoulders can totally transform the look, fit, and feel of a sweater—but only if you know a few key tricks. Before you pick up your needles, discover the 7 things every knitter wishes they’d known first.
Saddle shoulders can totally transform the look, fit, and feel of a sweater—but only if you know a few key tricks. Before you pick up your needles, discover the 7 things every knitter wishes they’d known first. <a href="https://farmfiberknits.com/knitting-saddle-shoulders-7-things-you-ll-wish-you-knew-first/">Continue reading.</a>
https://farmfiberknits.com/cdn-cgi/image/format=auto/https://www.datocms-assets.com/101500/1756406864-vintage-maple-showing-sleeve.jpg?auto=format&w=900
When you put a saddle on a sweater, it just looks cool. Take this cabled Vintage Maple Cardigan designed by Lisa Lloyd.
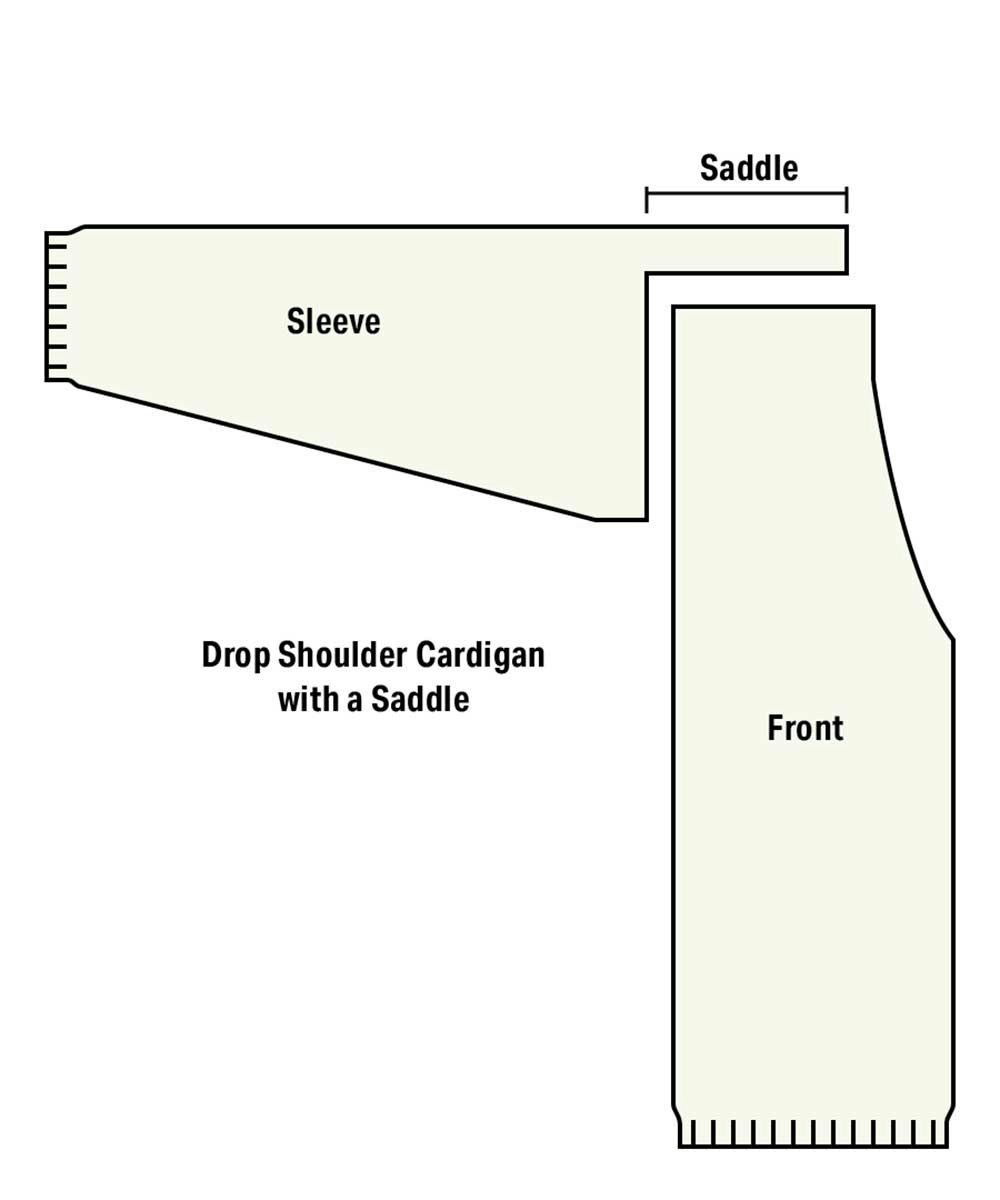
Where’s the saddle? The fabric that extends from the top of the sleeve over the shoulder to the neck edge is what we call a saddle shoulder in knitting.
Lisa put a cable on the saddle, which creates a strong visual line up the arm. This element is primarily a design choice, but it does have structural effects on the whole sweater, and it impacts the measurements in other parts of the sweater.
 The Vintage Maple Cardigan's saddle shoulder allows a gorgeous cable to run uninterrupted from sleeve cuff to neckline.
Let’s take a look at how saddle shoulders change a knitted sweater, and some things you should consider when knitting them. Take it from a knitter who’s been there.
7 Considerations for Saddle Shoulders:
1) Fudge the swatch at your own peril. Achieving the pattern gauge will be key to making the saddle and body work together. This includes row gauge! Make sure you swatch for stitch and row gauge in pattern.
2) Know your armhole. The Vintage Maple Cardigan is a drop-shoulder construction with saddle shoulders.
SUBSCRIBER EXCLUSIVE
When you put a saddle on a sweater, it just looks cool. Take this cabled Vintage Maple Cardigan designed by Lisa Lloyd.
Where’s the saddle? The fabric that extends from the top of the sleeve over the shoulder to the neck edge is what we call a saddle shoulder in knitting.
Lisa put a cable on the saddle, which creates a strong visual line up the arm. This element is primarily a design choice, but it does have structural effects on the whole sweater, and it impacts the measurements in other parts of the sweater.
The Vintage Maple Cardigan's saddle shoulder allows a gorgeous cable to run uninterrupted from sleeve cuff to neckline.
Let’s take a look at how saddle shoulders change a knitted sweater, and some things you should consider when knitting them. Take it from a knitter who’s been there.
7 Considerations for Saddle Shoulders:
1) Fudge the swatch at your own peril. Achieving the pattern gauge will be key to making the saddle and body work together. This includes row gauge! Make sure you swatch for stitch and row gauge in pattern.
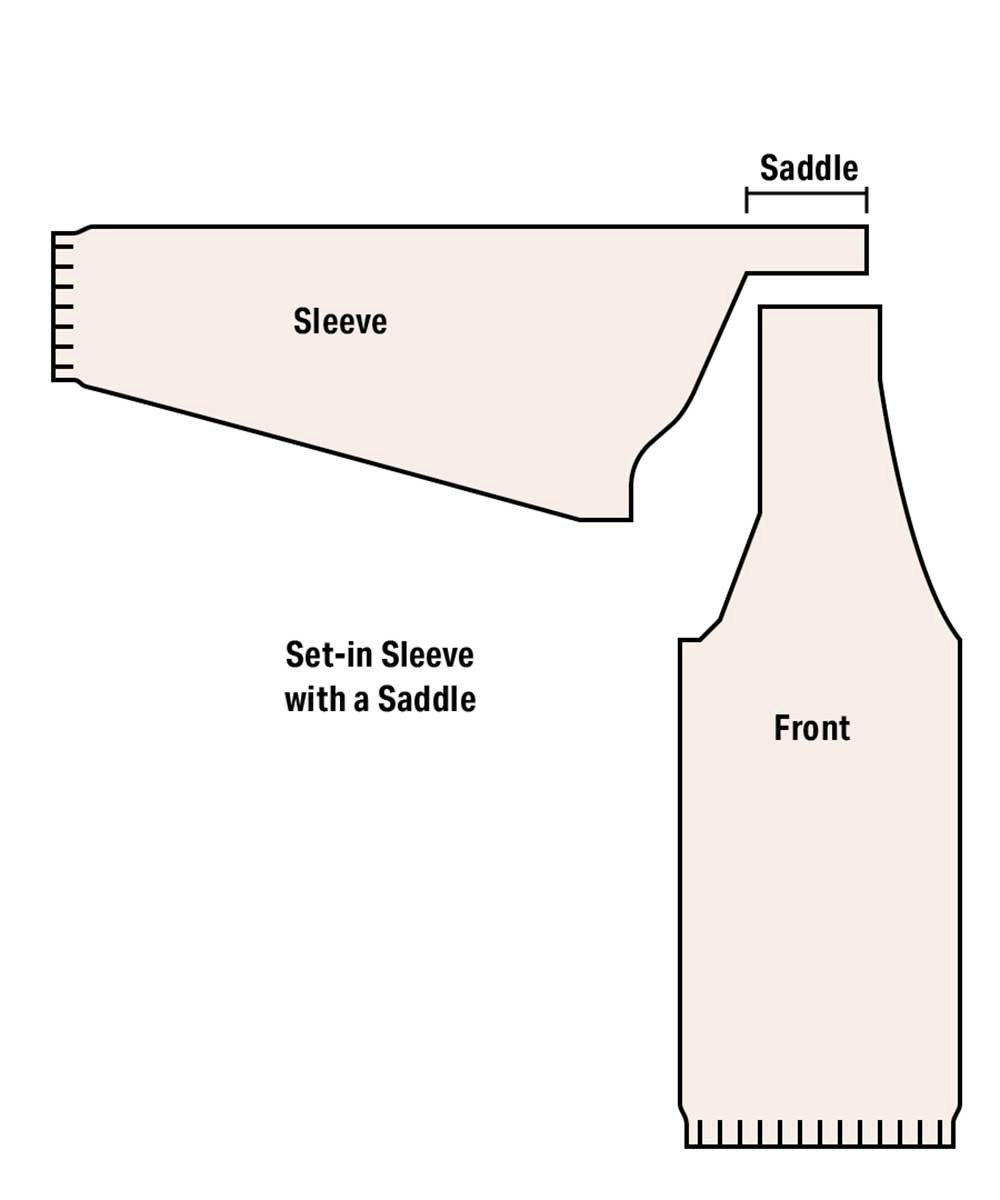
2) Know your armhole. The Vintage Maple Cardigan is a drop-shoulder construction with saddle shoulders.[PAYWALL] Compare that to a set-in sleeve with a saddle shoulder. The width of the shoulder and therefore the saddle length are very different! The calculations for the armhole and sleeve cap shaping are also different between drop and set-ins, so adding a saddle is handled differently for each style.
Get a closer look! Click any image in the gallery below to open it in full-screen mode.
3) 90 Degree Neat Freak. In this pattern, the saddle is seamed to the body fabric of the sweater, matching a vertical edge to a horizontal edge. This requires a special approach to seaming; I would use mattress stitch between a horizontal and vertical edge. Getting the seam to look neat may take some time and experimentation; it will be worth it!
Note: In her seminal work Knitting Without Tears, Elizabeth Zimmermann gives instructions for a “seamless” saddle, which is joined to the body with a decrease technique over live stitches. You could try this instead of seaming, as long as the number of rows in the saddle matches the number of stitches on the body at the shoulder.
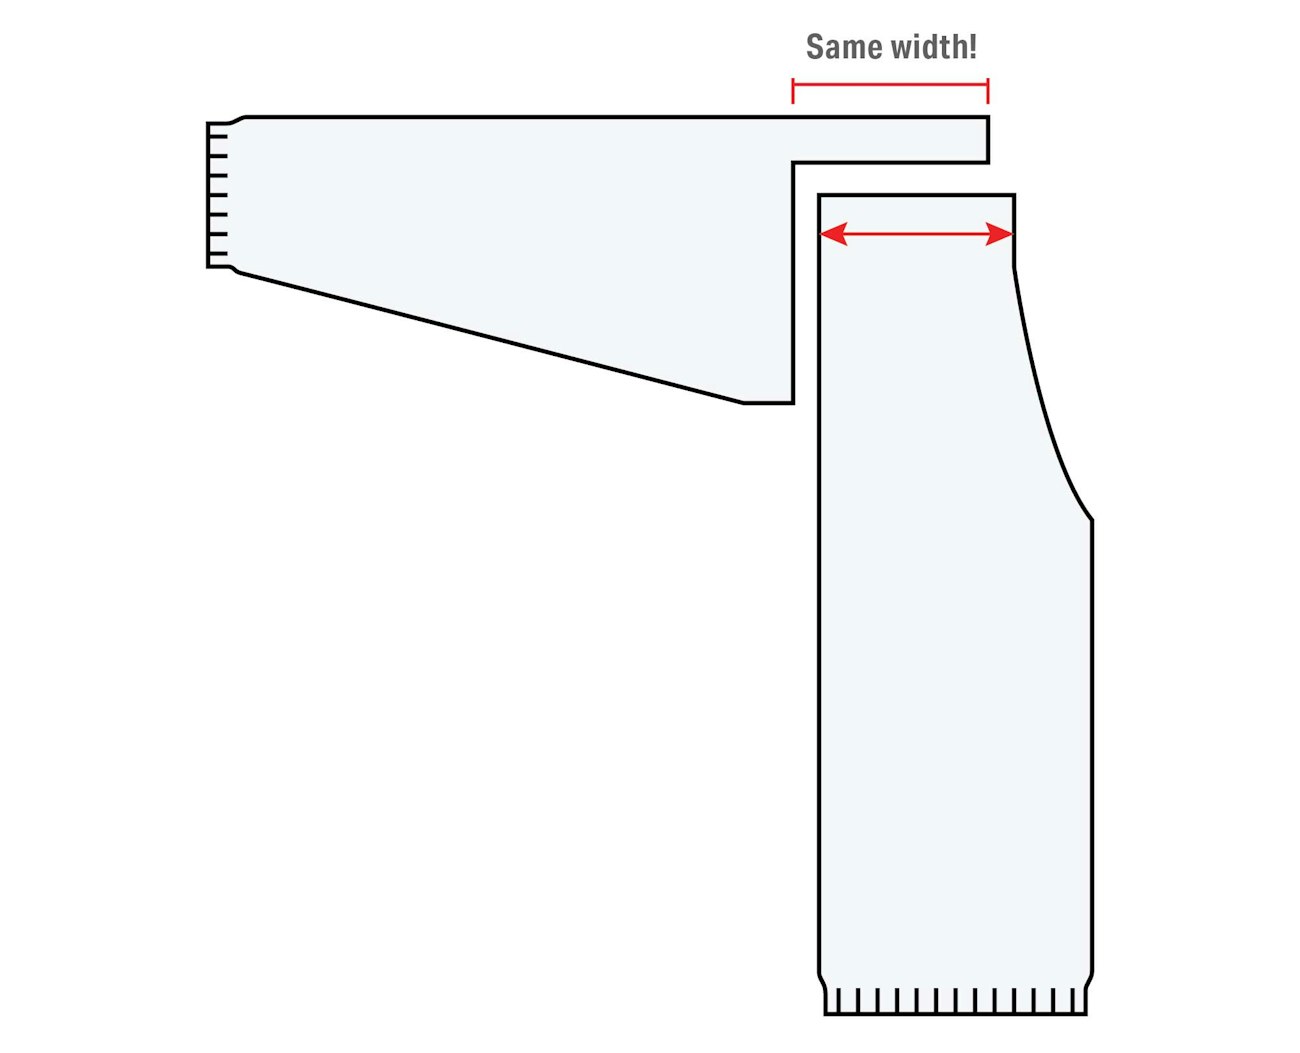
4) Equivalent Edges. To make the saddle length perfectly match the shoulder width, you have to plan both pieces carefully. The length of the saddle must match the width of the shoulder.
5) Planning armhole depth. The saddle fabric adds to the depth of the upper body on a sweater, so you must account for this when planning armhole depth on the body. If the armhole for your size in a drop shoulder usually measures 11", but you’re adding a 4" wide saddle, divide the saddle width by 2 and subtract that. 11- (4/2) = 9". That means you only knit an armhole 9" deep on the body, instead of the usual 11".
6) What’s on the saddle? The width and length of the saddle will affect the stitch and row counts, which affect the stitch pattern. In this pattern, we have a large cable repeat. Any changes to stitch or row count will affect your ability to achieve the full cable.
7) Bareback modification. You can remove the saddle and achieve a normal drop-shoulder shape by skipping the saddle instructions and binding off the full sleeve width. If you do this, you need to make the body armholes deeper by 2" on front and back.
Will it look good on you?
Yes. This sweater will look DREAMY on you. Dreamy and relaxed, okay?
A drop-shoulder cardigan with saddle shoulders is meant to be roomy and relaxed. The sweater is modeled in these photos with 10½" of positive ease, which means the sweater is bigger than the model’s actual body measurements by 10½" (learn more about ease here). If I was going to knit this sweater, with my 39" bust circumference, I’d choose the 46" or 50" size.
What happens in larger sizes of drop-shoulder sweaters, especially for people with shoulders that are narrower than their chests, is the upper body becomes increasingly oversized. For this reason, I would suggest larger-sized folks don’t work sizes with as much positive ease as modeled on the smaller model here. 6–8" of positive ease would reduce that roomy effect across the shoulders. (See Resources.)
Shoulders in a drop shoulder sweater are not tapered or narrowed with armhole shaping. So the width at the bust in this pattern will be the width across your shoulders. And that width is going to be decorated with cabled saddles.
 Lisa Lloyd designed the sleeves with a cable on the saddle, resulting in a strong visual line up the arm.
The drop-shoulder style has made a comeback in Knitworld of late. You’ll see the style popularized across Ravelry and social media; often worn loose and oversized with rich patterning. We’ve swung back from highly tailored, fitted set-ins and raglans to the relaxed fit. Thank goodness, I say.
It will look fantastic on you. You will feel cozy and autumn-licious, and you will be ready for a photo opp in a pumpkin patch or a reading nook full of books. If you want a tailored and fitted cardi with saddles, this is not the design for that. This design is meant to be loose-fitting and rich in texture.
Take the reins and knit some saddles.
Yeehaw,
Lisa
Find the Vintage Maple Cardigan in the Farm & Fiber Knits Library.
Resources
Learn more from Lisa Shroyer about adjusting fit in her book Knitting Plus: Mastering Fit + Plus-Size Style + 15 Projects.
Zimmermann, Elizabeth. Knitting without Tears. Fireside: New York, 1971.